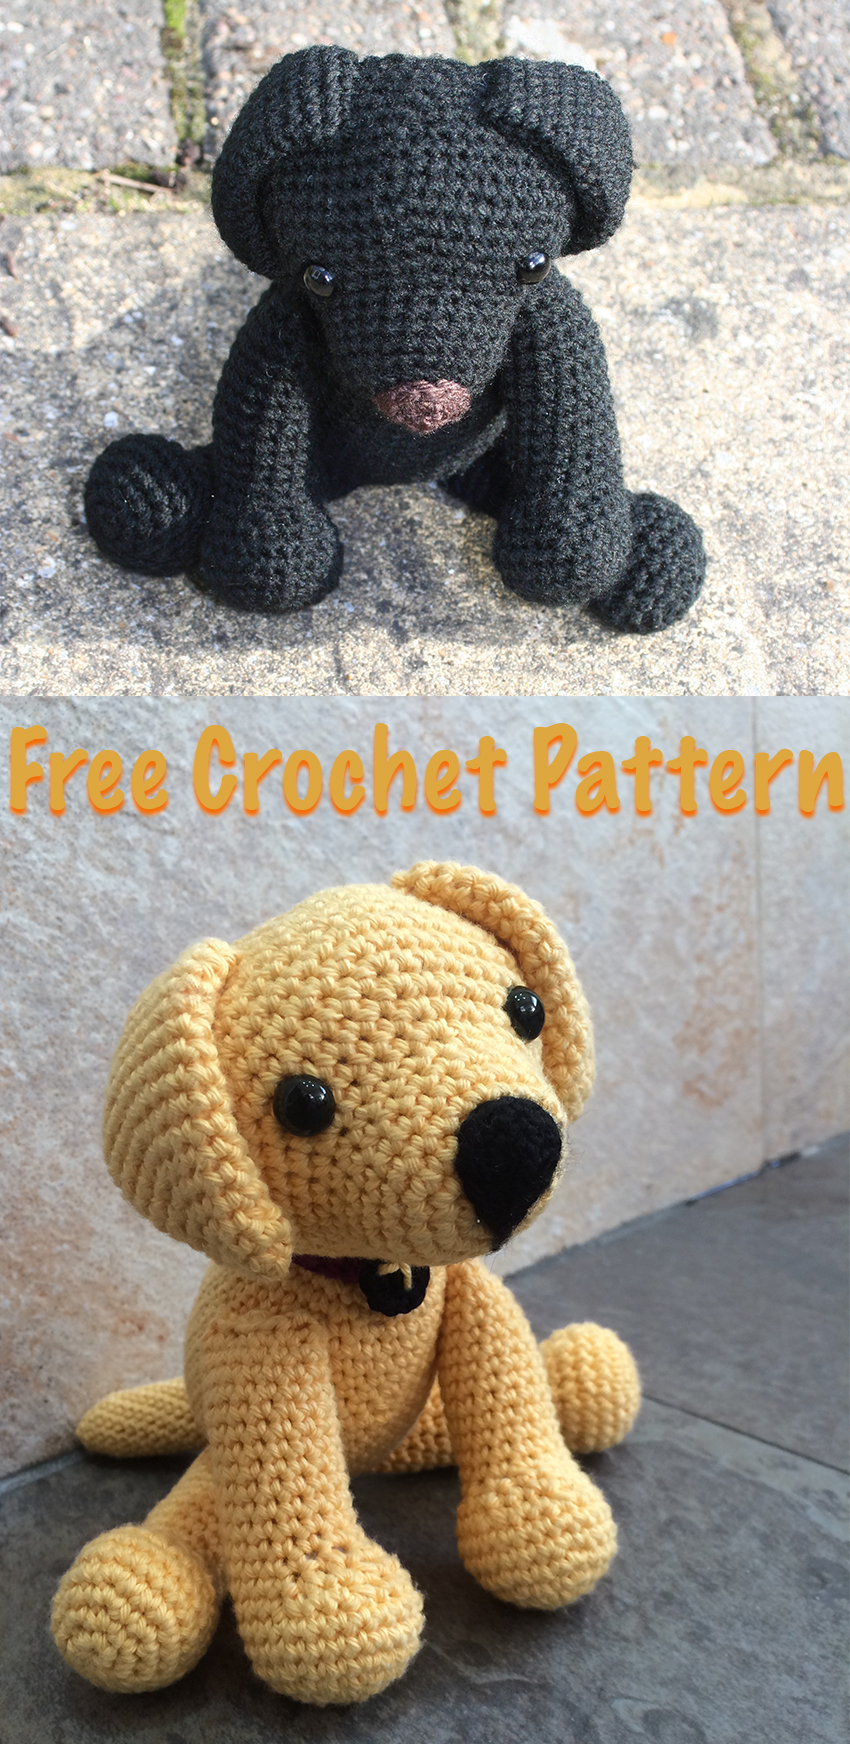
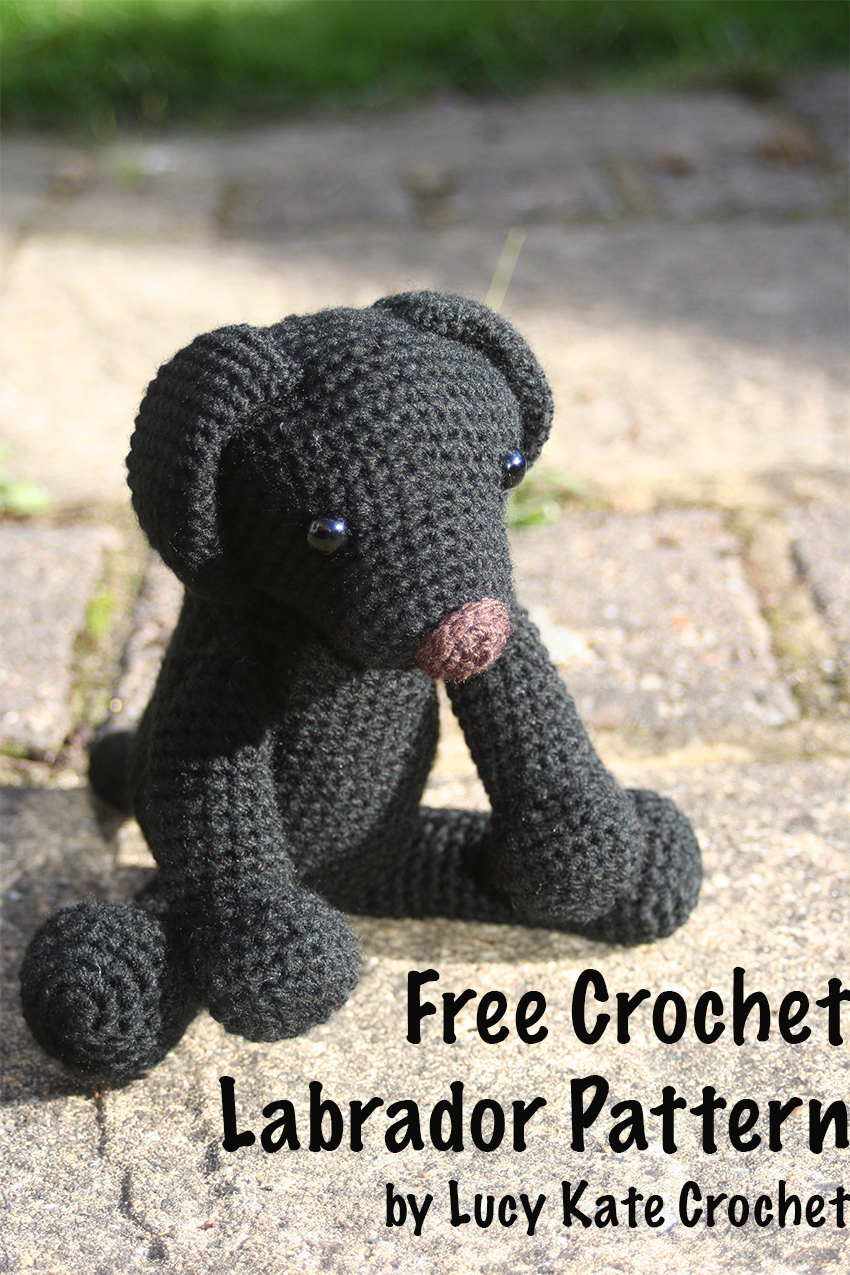
Crochet Labrador: How To Make Your Own Toy Dog
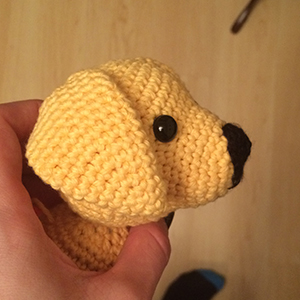
Would you like your very own handmade replica of your Labrador? A cute copy of your adorable pup, to proudly display in your home? The pattern below is for the yellow Lab puppy shown in the picture here, but you can adapt it to match your dog perfectly.
*I have included links to products that you can use to crochet your own Labrador.If you decide to purchase using the links provided, you’ll be supporting The Labrador Site by allowing us to earn a small commission on that sale at no extra cost to you.
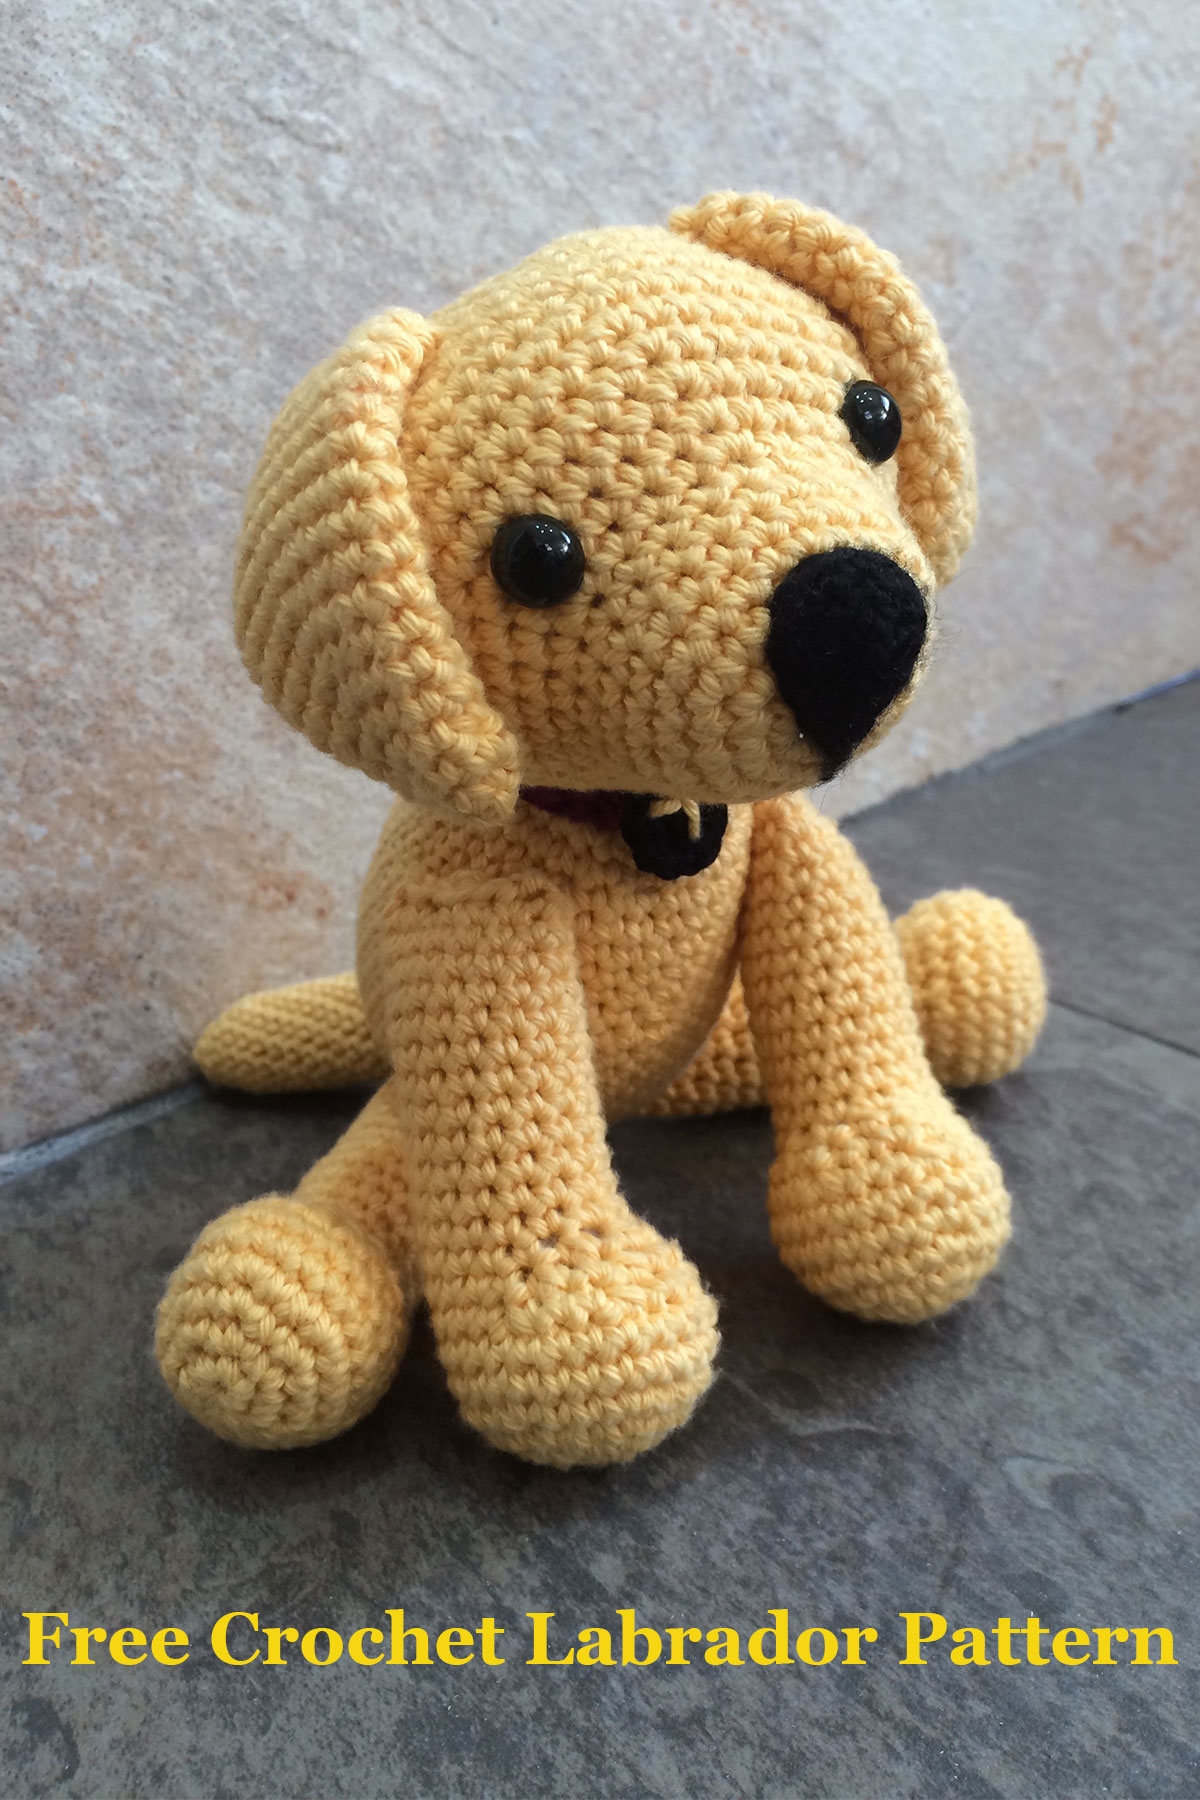
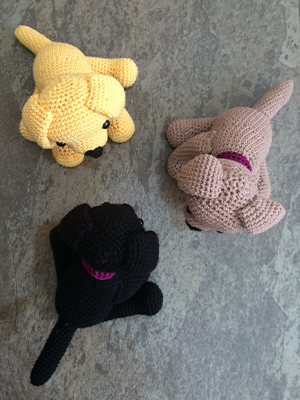
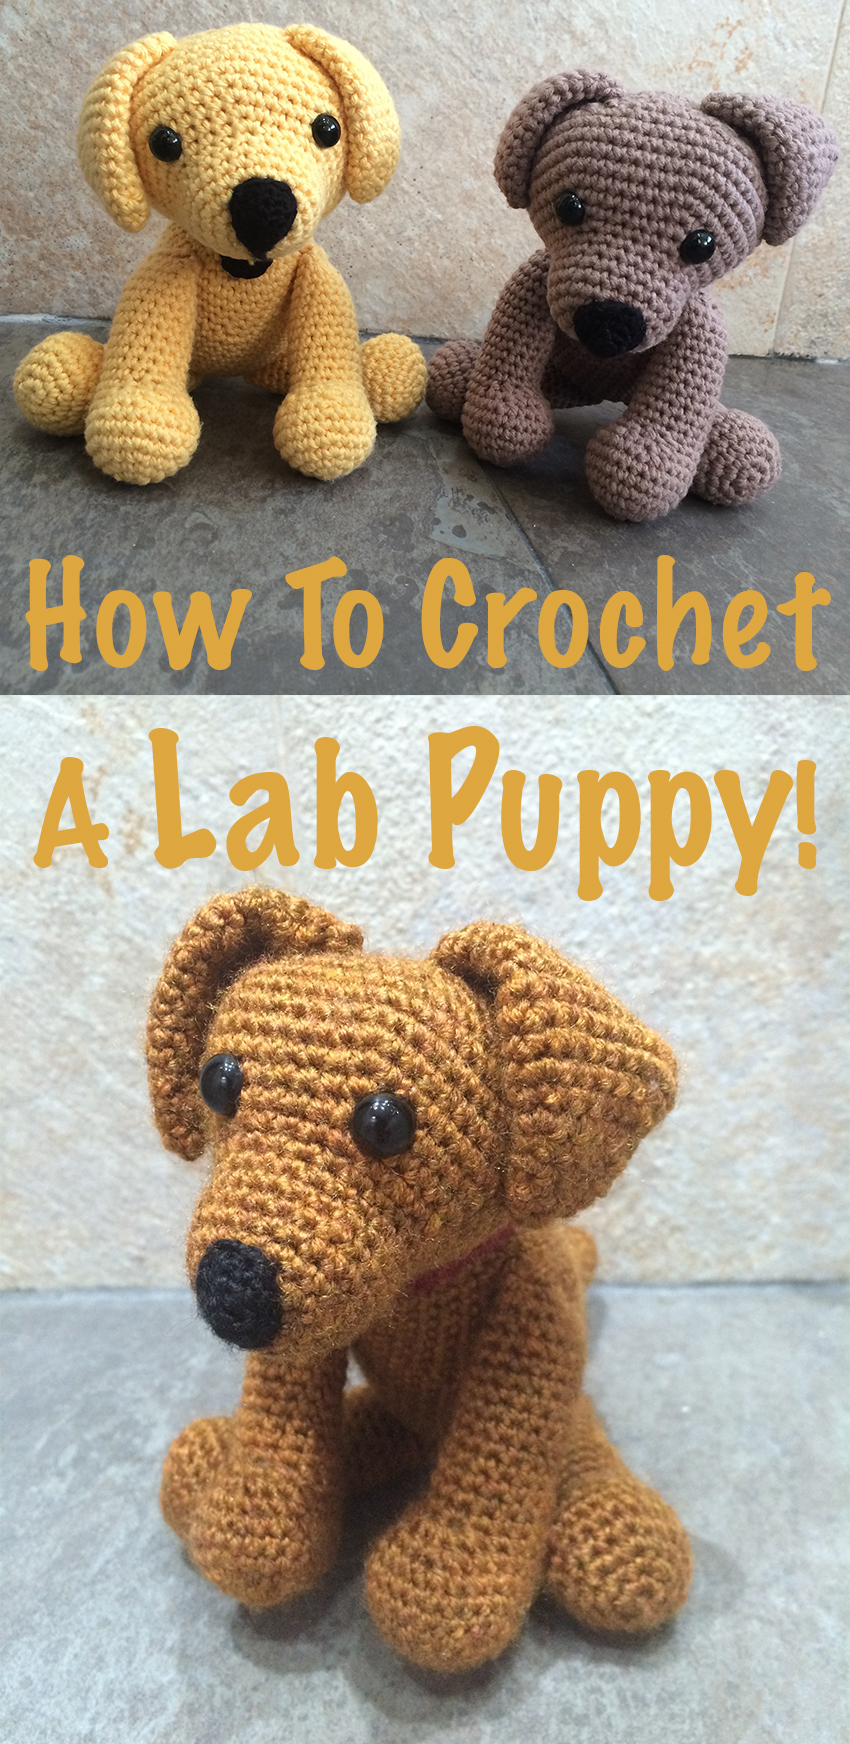
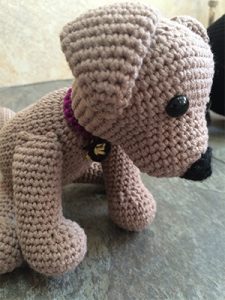
The black and chocolate dogs are slight variants on this pattern to give different looks to the puppy. If you want to make your own handmade crochet Labrador puppy toy you can find out how to do so with the easy instructions below.
Crochet Labrador Puppy Pattern
Each crochet Labrador you make will have it’s own unique style, which will vary depending on the color and type of yarn you use.
Looking for a darker shade of chocolate or yellow, or even to reflect your Lab’s larger ears or adorably big puppy feet, then just adjust the pattern. You can ask for help in the comments section below if you get stuck. But the really fun part is making the toy yourself. So why not give it a go? Even if you are brand new to crochet, there are instructions to help you get started.
Techniques and Instructions
If you are new to crochet, then check out this article to get to grips with the basic techniques before you begin your Crochet Labrador. For help with reading patterns, you might find this crochet abbreviations information useful as well.
Your crochet Lab will be worked in a circular pattern, building from a magic circle. You’ll also find the following stitches and instructions in this pattern:
- sc – single crochet
- 2sc – make two single crochets into one stitch
- sc2tog – join two stitches together with one single crochet
You’ll be crocheting your Labrador puppy in sections, then hand sewing them together.
Equipment
To make your own crochet Lab puppy you will need the following equipment.
Main Body Yarn
Your choice of main yarn will depend upon which color crochet Lab you want to create.
Choose only one of the following:
- 100g yellow aran yarn(paid link)*
- 100g light brown yarn(paid link)*
- 100g dark brown yarn(paid link)*
- 100g black aran yarn(paid link)*
Other Yarn
- 25g purple yarn(paid link)* for the collar
- 25g of black yarn(paid link)* for the nose and mouth
Other Supplies
- safety eyes(paid link)*
- Size E / 3.5mm crochet hook(paid link)*
- stitch marker(paid link)*
- sharp scissors(paid link)*
- yarn needle(paid link)*
- toy stuffing(paid link)*
If you are new to crochet, you might want to buy a complete starter kit* (paid link)to get you going.
You can also buy crochet equipment from hobby stores. To follow this pattern it doesn’t matter which color yarn you choose, as long as the yarn weight is the same.
Most equipment can be found online through their websites or through Amazon. There are also a wealth of independent craft shops to be stumbled upon locally, where the prices are often a little higher, but you can find some fantastic quality unique yarns.
Crochet Labrador Puppy Pattern
The total number of stitches in each row will be shown in brackets at the end of the instructions. I recommend using a stitch marker to help you keep count of your stitches as you go. If you don’t have any stitch markers then you can use a small piece of yarn to mark your place instead.
Please note: my crochet patterns are always written using US terminology. If you are already keen on crochet but use the UK terminology, just have a quick check with this crochet terminology conversion chart before you begin.
The Head

Row 1
Make a magic circle of 6 stitches (6)
Row 2
Make 2 single crochets (2sc) into each stitch (12)
Row 3
Put 1 single crochet (1sc) into the first stitch, and 2 single crochets (2sc) into the next. (1sc, 2sc) Repeat six times (18)
Row 4
Put 1sc into the first two stitches, 2 sc into the next. (1sc x 2, 2sc) Repeat six times (24)
Row 5 to 9
Make 1sc in each stitch (24)
Row 10
(1sc x 3, 2sc) Repeat six times (30)
Row 11
(1sc x 4, 2sc) Repeat six times (36)
Row 12
(1sc x 5, 2sc) Repeat fives times. Then make 1sc in each stitch for the final 6 stitches (41)
Row 13
(1sc x 6, 2sc) Repeat fives times. Then make 1sc in each stitch for the final 6 stitches (46)
Row 14
(1sc x 7, 2sc) Repeat fives times. Then make 1sc in each stitch for the final 6 stitches (51)
Row 15 to 17
Make 1sc in each stitch (51)
Row 18
Put 1sc into the first seven stitches, then sc the next two stitches together. (1sc x 7, sc2tog) Repeat fives times. Then make 1sc in each stitch for the final 6 stitches (46)
Row 19
(1sc x 6, sc2tog) Repeat fives times. Then make 1sc in each stitch for the final 6 stitches (41)
Row 20
(1sc x 5, sc2tog) Repeat fives times. Then make 1sc in each stitch for the final 6 stitches (36)
Row 21
Make 1sc in each stitch (36)
Row 22
(1sc x 4, sc2tog) Repeat six times (30)
Row 23
(1sc x 3, sc2tog) Repeat six times (24)
Take two safety eyes and attach them just beyond the crochet Labrador puppy’s muzzle.
Row 24
(1sc x 2, sc2tog) Repeat six times (18)
Fill the head with toy stuffing. Do not overstuff, make sure you can gently squeeze the head and that stuffing is not separating or poking through the stitches.
Row 25
(1sc, sc2tog) Repeat six times (12)
Row 26
sc2tog six times, then thread your yarn needle and sew the head closed. Leave a long string of yarn for attaching the head to the body later.
Crochet Labrador Nose
To make your crochet Labrador a nose you will need to make a small separate circle using your black yarn.
Row 1
Make a magic circle of three stitches (3)
Row 2
Put 2sc into each stitch (6)
Row 3
Put 1sc into the first stitch, then 2sc into the next. Repeat for the round (9)
Using your yarn needle, sew your small black circle onto the end of your muzzle. Place it slightly higher than the centre starting point and between the position of the eyes. You can also sew on any mouth features you want below the nose, using your threaded yarn needle.
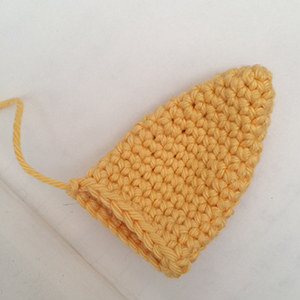
Crochet Labrador Ears
You will need to make two crochet Lab ears for your toy. Using the same colour as their body, and working from a magic circle again in a circular pattern.
Row 1
Make a magic circle of 3 stitches (3)
Row 2
Make 2 single crochets (2sc) into each stitch (6)
Row 3
Put 1sc into the first stitch, and 2sc into the next. (1sc, 2sc) Repeat three times (9)
Row 4
Put 1sc in each stitch (9)
Row 5
(1sc x 2, 2sc) Repeat three times (12)
Row 6
Put 1sc in each stitch (12)
Row 7
(1sc x 3, 2sc) Repeat three times (15)
Row 8
Put 1sc in each stitch (15)
Row 9
(1sc x 4, 2sc) Repeat three times (18)
Row 10 to 17
1sc in each stitch (18)
When finished do not stuff, simply sew the bottom of the ear closed in a line.
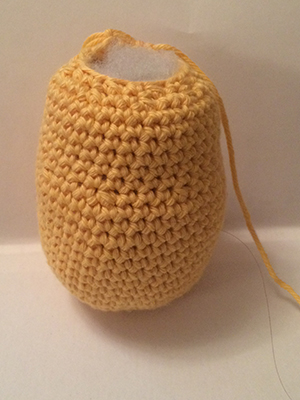
Crochet Labrador Body
To make the crochet Lab’s body, follow the same circular pattern as the head. Using your 3.5mm crochet hook and yellow yarn.
Row 1
Make a magic circle of 8 stitches (8)
Row 2
Make 2 single crochets (2sc) into each stitch (16)
Row 3
Put 1 single crochet (1sc) into the first stitch, and 2 single crochets (2sc) into the next. (1sc, 2sc) Repeat eight times (24)
Row 4
Put 1sc into the first two stitches, 2 sc into the next. (1sc x 2, 2sc) Repeat eight times (32)
Row 5
(1sc x 3, 2sc) Repeat eight times (40)
Row 6 to 17
Make 1sc in each stitch (40)
Row 18
Now begin to decrease the circles. (1sc x 3, sc2tog) Repeat eight times (32)
Row 19 to 26
Make 1sc in each stitch (32)
Row 27
(1sc x 2, sc2tog) Repeat eight times (24)
Fill the body with toy stuffing
Row 28
(1sc, sc2tog) Repeat eight times (16)
Row 29
sc2tog eight times, then thread your yarn needle and sew the head closed. Leave a long string of yarn for attaching the body to the head later.
Crochet Labrador Legs
To make your Labrador feet and legs, following the instructions below four times. For this pattern the front and back legs are identical, but they are closed and attached differently.
Row 1
Make a magic circle of 6 stitches (6)
Row 2
Make 2 single crochets (2sc) into each stitch (12)
Row 3
1sc into the first stitch, and sc into the next. (1sc, 2sc) Repeat six times (18)
Row 4
(1sc x 2, 2sc) Repeat six times (24)
Row 5 to 6
Make 1sc in each stitch (24)
Row 7
Make 1sc in the first 12 stitches (sc x 12), then (1sc x 2, sc2tog) three times (21)
Row 8
(1sc x 12), then (1sc, sc2tog) three times (18)
Row 9
(1sc x 12), then sc2tog three times (15)
Row 10 to 23
Make 1sc in each stitch (15)
To close – for the front legs sew closed in the direction of heel to toe. For the back legs, sew closed at a right angle to the front legs, from side to side. Leave a long strand of yarn from each finished leg for sewing together later.
Crochet Labrador Tail
Row 1
Make a magic circle of 3 stitches (3)
Row 2
Make 2 single crochets (2sc) into each stitch (6)
Row 3
Put 1sc into the first stitch, and 2sc into the next. (1sc, 2sc) Repeat three times (9)
Row 4
(1sc x 2, 2sc) Repeat three times (12)
Row 5
(1sc x 3, 2sc) Repeat three times (15)
Row 6 to 19
Make 1sc into each stitch (15)
Fill with toy safe stuffing.
 (paid link)
Row 20
Make 1sc in the first seven stitches, then 2sc in each of the last 8 (23)
Sewing Your Crochet Labrador Together
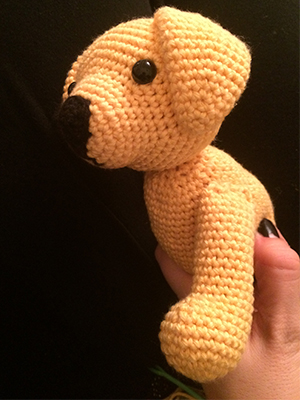
To sew your crochet Labrador together use the yarn threads you left when you closed each section. Make sure to use fine stitches, weaving through each corresponding crochet stitch to firmly attach the segments together. Position the front legs at either side of the chest, and the back legs under the bottom. This will give your puppy a canine style seated position when you put him down.
Crochet Labrador Puppy Collar
I have given my Labrador puppies collars. To make them you will need to use your purple yarn to begin with.
Make a chain of twenty one stitches. Starting from the third stitch from the hook, make a single crochet into each stitch. At the end of the row tie off.
To make the collar tag, make a magic circle of four stitches, and put two single crochets into each stitch of the circle. Tie off and sew the tag onto the collar using the loose thread of yarn.
You can then sew the first initial of your Lab’s name onto the collar to make it even more your own!
Your Personalised Crochet Labrador Puppy
When you make your own crochet Lab puppy using the instructions above, you will find that he looks like the yellow Lab pup in the pictures. But I am a big fan of taking an existing pattern and giving it a unique twist. The easiest way to adapt the pattern is to add or remove rows.
Think your Labrador has longer legs? No problem, just add a few rows to the length. Want to give him shorter ears? Then just take a row off the length there instead.
You can also use different coloured yarns to reflect his shade, although I highly recommend staying with the same yarn type. Different types or ‘weights’ of yarn give different stitch sizes and finishes to the toy.

Free Labrador Updates!
Get my training tips, news, reviews, and the latest from The Labrador Site delivered to your inbox
Love the pattern but could you please post a printable pattern?
Hi Lucy,
I love the pattern of the puppies. I crochet and I’m going to take a shot and try to make all of them. I just had 3 niece’s and have a nephew & another niece on the way! So I will be busy for Christmas!!
This is an awesome pattern! Can’t wait to try it! Couple questions… the brown puppy looks like it has a longer snout than the yellow lab. Did you add rows to this? I counted and they seemed the same and it’s hard for tell on the picture:) Also, I saw this question asked but didn’t see an answer so I’m sorry if there was one and I missed it!? but what are the dimensions of this dog? How tall is it sitting? Thanks again!!
Hi Lucy, I was wondering if you can tell me the dimensions of the basic pattern (height and depth/width), I’m making a wedding present for a friend, who is an avid lab lover, I have a specific sized box picture frame to work with and the pattern looks perfect. Thank you
Hi Lucy!! I love the dog. I want to do it wearing a costume to sell it. Do you mind if I make?
I have tried two times and my head doesn’t look like yours there is no muzzel
Hi Michelle, Row 5 to 9 should extend the muzzle. It is possible that if you are using a fine yarn or have very tight stitches you could end up with a less pronouced nose, so just add in a couple more rows at this point to give his face more definition. Hope this helps! Lucy
Just made this up for a friend’s niece. Thank you for the pattern
So cute! The Amigurumi crochet group just posted this on facebook to share.
Awww. Great job!
Thank you for making this a free pattern. My mother’s belived golden retriever passed away a year ago. We have her three daughters still but it still makes her sad. I will be making this for her. Thank you so much. This will make her cry tears of joy
There are 8 stitches in last row of the tail that are doubled crocheted. When sewing the tail, is the tail with the double crocheted section faces up or down? Thanks.
Hi Lucy!
My aunt wants me to make this dog for her however she wants it to sort of look like a beagle lab mix kind of dog, so for example she wants the ears a darker color and maybe a brown patch on its back and then brown like around the eyes. I was wondering if you could help me figure out where to do the color changes and how long to make them?
Fantastic and cute pattern thank you. I am hoping to make one for a gift for my daughters friend. Can you tell me how big it ends up being please? Hope it is big enough to cuddle! I am in the uk and will be using DK wool. Thanks for the help
How tall is the finished yellow labbie? I saw someone else ask but didn’t see a reply?
Hey lucy quick question. I am on row 18 of the head and stuck with the mast bit everything has met my stitch marker but this row. I did the final 6 and im left with 3 stitches. How do i fix this?
I just finished a black lab. Our grand daughter is obsessed with our dog Jake. Thanks for the pattern, it is really cute! Wish I could have posted a pic.
Lucy these are adorable, onto number three!!
Thank you for the creativity, time, effort and the sharing.
Love from Downunder
This is such a cute pattern! I am working on one right now, and unless I missed something,,I am supposed to stuff the legs, right?
Can you tell me what size safety eyes you used?
Hi Meghan, I used 10mm safety eyes. Best wishes, Lucy
Thank you!!!
I am almost finished but he looks a lot bigger than yours in the picture. Would you have an approximate finished size?
I would also like to know approximately how big the sweet labs are, please!
Hello Lucy,
I have a question for the pattern. I am translating this pattern to Dutch for my mom. She has a little facebook group with some other Dutch people that crochet. Can she share the translated version there? I will have all your info in the document and it will be absolutely free of course so we will make no profit from it.
Kind regards,
Hi Desiree,
Thank you for asking permission. If you make this pattern into a post on Facebook, please link to my original pattern on The Labrador Site as the first link at the beginning of the post.
Best wishes, Lucy
It will be in pdf and then I will post the link of that on Facebook. In the pdf will be your info. I will send you the first version in the e-mail.
Love this pattern! It’s incredibly adorable. I’m just finishing up making my first one, and I’m working on the tail. Either I’m not doing something correctly or there is an error in the directions… I get to row 5 where is calls for (1sc x2 -2sc) the same as row 4. Row 4 I get 12 SC around, but then row 5 I end up with 16 stitches going around, and the pattern also says times 3 which wouldn’t bring me back to the start… I just finished the round with 3 SC at the end to get my 15 stitches. I didn’t see any other comments about it, so I’m I doing something wrong??
Hi Sarah, Thanks for your message. Row 5 had a typo – I have corrected it now. It’s meant to read Row 5 – (1sc x 3, 2sc) Repeat three times (15). Best wishes, Lucy
Thank you!! I’m making my 2nd one as we speak!! Love it, thanks for the pattern!!
I love this pattern so very much but I’m not sure what u mean by sewing front legs heel to toe and back legs right angle from side to side , please help I want to finish this for a gift. ( is there a video)
Hi Lynda, I don’t have a video I’m afraid. It’s to give the feet the correct direction when they’re placed. As the front legs go on the sides, for the feet to face forward they need to be sewn heel to toe. The back legs are sewn underneath, so for the feet to face forward they need to be sewn side to side. I hope this helps to clarify. Best wishes, Lucy
hi love this pattern thank you, can you please tell me on what number row do i place the eyes and how many stitches apart please ?
Hi Sheryl, Place the eyes after the muzzle just as the face starts to increase, at around row 13. You will need to position them by eye, but they will able around 14 stitches apart at a rough estimate. I hope this helps! Best wishes, Lucy
Really appreciate that tip, thank you
I am apparently doing the head wrong. All I end up with is a round head with no muzzle. Can someone tell me what row the muzzle is supposed to start?
NVM!! I see it!! I think!
Hi Rhonda, The initial magic circle is the center of the muzzle. Rows 5 – 9 are what gives the muzzle it’s prominent length. Hope this helps! Lucy
Quick question, on the tail, is there anything after row 20? It seems like there is something missing.
Hi Stefanie, Row 20 is the last for the tail. The slight widening is to make it easier to sew it onto the body later. The tail is sewn on open with the stuffing exposed. I hope this helps. Best wishes, Lucy.
HI , just wondering how tall is this lil cute puppy ? Thanks for the sweet pattern, i plan on making one for my niece 🙂
Hi , I am just wondering what is the finished size in inches of the dog , how tall is he ? My Niece , Reagan just loves dogs !! 🙂 she would love one of these cuties 🙂 . thanks for the pattern !
Hi, your pattern I’d amazing. I plan to make my granddaughter one for Easter instead of candy. Do ypou know where I could find a Chihuahua and hunting dog pattern. It would make my other 2 grandchildren happy. Thank you in advance.
Hi there. I’d like to make this pattern for a friend’s baby shower. I see it says you need 100g of the main color yarn. Do you use the entire 100g for the pattern?
Most of it, yes!
I was wondering do you sew the tail shut before you attach or leave it open? I have made this and it is so easy and so cute but don’t know how the tail should go.
Thank you for this cute cute pattern
Hi Paula, I am pleased to hear that you have enjoyed the pattern. I leave the tail open and sew around the edge. Hope this helps!
Yes thanks bunches!
Do you have a pattern for a Labradoodle?
Hi Jean, I do intend to make a Crochet Labradoodle pattern in the future.
In the meantime, I have a pattern for a Crochet Poodle here: http://lucykatecrochet.com/crochet-poodle You could combine the two to make your Crochet Labradoodle!
Do you not chain 1 or 2 at the beginning of each row? I’ve never made anything circular and not chained at the beginning. Also, does the first sc of each round go into the same as your slip stitch or does it go into the next? I’m assuming you slip stitch into the first chain of each round? It doesn’t state to do so.
You crochet in the round so there’s no slip stitch and the end of each row, you just carry on going round into the next stitch, it’s best to place a stitch marker in the last stitch of each round so you don’t loose your place ????
Hi Lucy,
I love this pattern and I’m making one for my mum who has a Labrador obsession!
I was wondering where you got the yarn and what the colour name is. I live in the UK as well so I have access to the shops that you do.
Thanks,
Ethan ????
Thank you from the USA. I am going to make a few of these up for the grand kids. I am also going to make a donation to my local shelter in appreciation. ????
Would love to know what you did differently with the rust colored puppy. His head seems to have a different shape. And maybe shorter ears. So cute! Thank you
This is so cute and I’d like to know how tall they are please. I would like to make them for 2 and 4 year old little girls.
Thanks so much Lucy, I can’t wait to give this pattern a go 🙂
Hi,
I am from Australia and was wondering what ply the yarn is that you use for this?
I can’t wait to try this pattern out 🙂
Thanks!
Hi Rachel, I think this is the equivalent of 8ply if Australia has the same yarn weighting as the US?
I think you would be better with a 12 ply, onto my third in the land downunder. Use the same size hook though 3.5. Our weights are not the same as US
hi is the flat part of the head at the top or at the bottom when sewing it together
Hi Tracey, The flat part is to define his jaw a little, so pop the domed bit at the top. Hope this help! Best wishes, Lucy.
Do you have a link on how to sew everything together? This is my first project beyond blankets and scarves and I’m only finding videos on how to sew open pieces together. Thanks.
hi there lve the pattern haven’t made it as of yet though but I will be 🙂 I was wondering though if we are allowed to make them to sell I know some people don’t allow sales of their patterns so just asking TIA
Hi Romana, I am pleased you like the pattern. You are welcome to sell toys you have made using any of my patterns. (Just please do not sell or duplicate the written pattern itself!) Best wishes, Lucy.
WHAT PLY IS THE YARN AND IS IT WOOL OR SOMETHING ELSE, AS I LIVE IN AUSTRALIA AND WANT TO MAKE ONE OF THESE LOVE LABRADOR DOGS FOR A GIFT.
Use acrylic 12 ply, works really well – from Australia
My grand daughter was so delighted with this puppy whose name is Biscuit. She has a couple of story books about Biscuit and this puppy looks just like the one on the cover of the book. Thank you soooo much!
What a sweet toy! Do you mind if I post a link on Labrador Retriever Rescue Scotland’s Facebook page? I think they would make great fundraisers.
Hi Gillian, I am pleased to hear that you like it 🙂 You are welcome to link to this article. Best wishes, Lucy
Hi! Great pattern – thanks for sharing!! Just wondering… About how long does it take you to make each dog? I’d like to make one to give as a gift next week but I’m wondering if I’ll have the time. Thanks!!
Hi i love the pattern, I was wonder what size safety eyes are used for the head just so that I don’t over/under estimate the size
Hi McKenna, I am pleased to hear you like the pattern. The safety eyes I used came from Hobbycraft and have a diameter of 10mm. I hope this helps! Best wishes, Lucy.
Hi, thank you for posting this pattern it is wonderful. I would like to know if there is a way I can adapt this pattern to make golf club covers for my husband’s clubs. We are proud owners of a Black Lab named Buddy. He is the mascot for my husband’s golf team. I have been looking for a pattern to make a plush lab head.
Thank you,
April
Hi April, I am so pleased to hear that you like the pattern.
To adapt a plush toy to fit onto something in this way, I make the head, legs and top half of the torso. I would then extend the length of the body by continuing in circular rows to form a sock which will slip over the gold clubs.
Buddy sounds like an excellent mascot. If you decide to use the pattern to make the covers, please do share a picture or two on the Lucy Kate Crochet Facebook page – I would love to see what you come up with! x
this pattern is mor than great, easy to understand,
i’ve got a Question, Do you also have Patterns for cats, “HUsky”?
thx
Thanks, I am glad that you like the pattern.
Both crochet cats and crochet Huskys are patterns I will be posting in the future on my crochet site. Keep an eye on http://www.lucykatecrochet.com , or you can join my Facebook page to see when they are posted up.
Best wishes, Lucy
I really like this pattern. It seems very straight forward. I am just curious if I adapt it using hdc or dc what it will turn out like. Is it even possible to 2tog using those stitches?
Hi Ashley, I think you would be okay with an hdc, but with a dc it might look a little loose and not enclose the stuffing enough.
If you want to give it a go though, I’d recommend just starting with making one of the limbs and seeing how it looks, so you don’t waste too much yarn (or time) if it’s not a success.
You can absolutely 2tog those stitches, the principal is the same as sc-ing two together. To dc2tog yarn over your hook, hook through the stitch, yarn over, pull through, yarn over, pull through the first two loops, then yarn over and put the hook through the next stitch, yarn over, pull through, yarn over, pull through two loops, yarn over, pull through the last three.
I don’t have a hook with me right now, but going through it in my head I think this is correct – I will check when I get home and amend if necessary 🙂
Do let me know how you get along with your pattern alterations! You can share photos to the Lucy Kate Crochet Facebook page if you like as well.
Thank you for the pattern! I’m making the head to attach to a security blanket.
Hi Josie, I’m glad you like the pattern. The security blanket sounds lovely, what a great idea. Best wishes, Lucy
I would love one of these. I am from pa and can not for the life of me crochet. How much in us dollars. Please advise
The black one with the purple collar IS Lilly x